Starving blog for want of posts! But now something worth sharing... Thanks so much to Donna for the inspiration based on the card she started at a craft day I attended on Saturday.
Very simple, used a rainbow of Stampin' Up! ink colours stamped across whisper white card. I overlapped Gorgeous Grunge lines stamp just slightly to get all 7 rainbow colours across the card. Old school rainbow of Red, Orange, Yellow, Green, Blue, Indigo, Violet. Silver Glimmer cardstock used for three of the hearts and the Love sentiment is from the Expressions Thinlits. My tip, put wide double-sided tape on the back of your glimmer paper before cutting with the Thinlits. Hearts all adhered with two-way glue pen.
Stamp set: Gorgeous Grunge (130514)
Materials: Whisper White, Silver Glimmer (124005), cardstock scraps for the inks below (except Rose Red - might have been Cherry Cobbler card-scrap).
Inks: Rose Red, Tangerine Tango, Crushed Curry, Gumball Green, Island Indigo, Midnight Muse, Elegant Eggplant.
Other: heart from Stampin' Up! Owl builder punch (118074), Stampin' Up! Expressions Thinlits (132171)
Showing posts with label Punch Art. Show all posts
Monday, September 30, 2013
Tuesday, February 21, 2012
Cased card and News
So at our last StampInkPaper team meeting, I was making a bunch of birthday cards. Kay, one of my sister team members showed me a card by Ruth
Clarke and mentioned a friend would love this for her birthday. I had loads of bits of the Spice Cake paper chopped up so I went to work. Tea-bag fold on 8 circles which are then placed together to form a flower. Brad in the middle and voilà!
Supplies are Spice Cake DSP, Antique brad, Bring On the Cake stamp set, Early Espresso card body, Pool Party layer, Very Vanilla layer. Coloured "Birthday" with Pool Party marker and stamped sentiment in Early Espresso ink.
News is that I've accepted a position with the ACT Public Service in Canberra until the end of June. I'll be travelling down on Sundays and returning home on Fridays. Will be busy, but worth it for both mental and financial health. Also hoping it will lead to other opportunities at higher levels in the future and allow the family to move in July. But nothing is ever set in stone, so we'll see how it goes. At the least it will give me very recent experience in work I very much enjoy (stuff I do voluntarily - being paid to do it is a bonus).
And last but not least, its my littlest man's birthday today. Toby is 7 today! I'd been in hospital for a few days with ruptured membranes (same thing happened with Ryan) and was anxiously awaiting induction for Toby. This is an old scrapbook layout I did quite some time ago about how strong (read STUBBORN) he was at 2 weeks old. Remember, this is one week before his due date: he was 3 and a half weeks early! He was such a fighter from the very beginning, but I suppose that's how you might be against the world when you're evacuated from your nice warm place a bit early.
Supplies are Spice Cake DSP, Antique brad, Bring On the Cake stamp set, Early Espresso card body, Pool Party layer, Very Vanilla layer. Coloured "Birthday" with Pool Party marker and stamped sentiment in Early Espresso ink.
News is that I've accepted a position with the ACT Public Service in Canberra until the end of June. I'll be travelling down on Sundays and returning home on Fridays. Will be busy, but worth it for both mental and financial health. Also hoping it will lead to other opportunities at higher levels in the future and allow the family to move in July. But nothing is ever set in stone, so we'll see how it goes. At the least it will give me very recent experience in work I very much enjoy (stuff I do voluntarily - being paid to do it is a bonus).
And last but not least, its my littlest man's birthday today. Toby is 7 today! I'd been in hospital for a few days with ruptured membranes (same thing happened with Ryan) and was anxiously awaiting induction for Toby. This is an old scrapbook layout I did quite some time ago about how strong (read STUBBORN) he was at 2 weeks old. Remember, this is one week before his due date: he was 3 and a half weeks early! He was such a fighter from the very beginning, but I suppose that's how you might be against the world when you're evacuated from your nice warm place a bit early.
Labels:
birthday,
bring on the cake,
DSP,
marker,
Personal,
Pool party,
Punch Art,
tea bag fold,
update
Sunday, April 03, 2011
Easter Bilby punch-art
In recent years for Easter in Australia there has been a campaign to raise awareness of one of our cuter endangered species, the Bilby. An Australian chocolate manufacturer, Darrell Lea, started making chocolate Bilbies for easter in 1994. From 1999, Darrell Lea has donated part of the proceeds from chocolate bilby sales to the "Save the Bilby" fund. So in celebration of Easter in Australia, I've designed a punch-art Bilby! They're nocturnal little guys so I started out putting them on a night of navy background. Didn't look right though. They're mostly in semi-arid areas of Australia and burrow in our dry-dry orange-golden dirt. So this is what I came up with based on a recent birthday card for a class using the "Autumn Days" stamp set...
I took a few photos along the way to show how I put this together. These bilbies are actually refinement number 3 - the first two were not-quite-right. And my daughter added her two cents saying just one looked "lonely" so I should make another for the card. The image below shows the bits I used and very simple instructions. Print this and the card above and I'm sure clever people can figure it out!
Happy punching!
Sunday, September 19, 2010
Launch at Michelle's
Long time between posts, I know. I had trouble finding the charger for our camera! Necessity made me find it so I could print up instructions for Michelle's 2010-2011 Catalogue Launch yesterday. I was a guest/helper and I demonstrated this card using an adapted technique from a video tutorial at Valita's Fresh Folds blog. Hydrangea's are one of my favourite flowers and are so pretty in various colours! The flowers are created using Valita's technique with the new Fancy Flower XL punch rather than the heart punch (which I don't own - yet!). I've added the sentiment from Garden Whimsy together with an antique brad - another new product. The flower centres are a dot of Multipurpose Liquid Glue with Olive supernova glitter. I used the same technique for the flowers to make the leaves with the scallop oval punch.
I also helped with this make-and-take card using the new Morning Cup stamp set and Take a Sip wheel. I have the clearmount version so it was a great opportunity to show off how easily the images assemble without having to use a stamp-a-majig. I love my clearmount stamps and especially love the Stampin' Up! clear blocks - they are a beautiful weight with a lovely rounded finger-hold edge all the way around. This card was made using reverse-masking to sponge colour into the different areas of the teapot and cup. I used a craft knife to cut away the area to be coloured from an image stamped in the middle of a post-it. Its a great technique for adding even colour to an image and it was so much fun to do with these little tea-cups! The guests all thought I was a bit bonkers for cutting around the little flowers on the teacup. We also used the new Stampin' Write markers now available in the In Colors! WOW! Its so lovely to get detail through with a fine-tip instead of using a blender pen or aquabrush loaded with In Color ink!
I'm thrilled with the new In Colors. This card uses Pear Pizzazz, Peach Parfait and Blushing Bride. Lovely colours!
I also helped with this make-and-take card using the new Morning Cup stamp set and Take a Sip wheel. I have the clearmount version so it was a great opportunity to show off how easily the images assemble without having to use a stamp-a-majig. I love my clearmount stamps and especially love the Stampin' Up! clear blocks - they are a beautiful weight with a lovely rounded finger-hold edge all the way around. This card was made using reverse-masking to sponge colour into the different areas of the teapot and cup. I used a craft knife to cut away the area to be coloured from an image stamped in the middle of a post-it. Its a great technique for adding even colour to an image and it was so much fun to do with these little tea-cups! The guests all thought I was a bit bonkers for cutting around the little flowers on the teacup. We also used the new Stampin' Write markers now available in the In Colors! WOW! Its so lovely to get detail through with a fine-tip instead of using a blender pen or aquabrush loaded with In Color ink!
I'm thrilled with the new In Colors. This card uses Pear Pizzazz, Peach Parfait and Blushing Bride. Lovely colours!
Labels:
garden whimsy,
hydrangea,
morning cup,
Punch Art,
reverse mask
Tuesday, June 01, 2010
Très Chic!
Oo La la! So for various reasons I challenged myself to think beyond the 'Cutsy' square for punch art... What's not cute? Sophisticated! Chic! French fashion, Chanel, etc! So I went searching for some images online with "Chic" silhouettes... And the rest, as they say, is history! Here's what I came up with:
I liked the bold red and black theme for this lady. The original image showed her walking a dog, but I kinda like the bag too. And the shoes! And the legs and the skirt!
Among the pictures I found the 1920's fashion... Hats say chic fashion to me.
Next on my list to try is an Audrey Hepburn look. I adored her in her movies... Sabrina, My Fair Lady, Breakfast at Tiffany's, Funny Face and Roman Holiday. And she was the quintessential stylish, graceful and poised lady. One of my favourite quotes of hers is:
For beautiful eyes, look for the good in others; for beautiful lips, speak only words of kindness; and for poise, walk with the knowledge that you are never alone.
-- Audrey Hepburn
Saturday, May 15, 2010
Guess who came to visit?
For quite some time I've been toying with the idea of a TARDIS card. Obviously fairly simple as its simply a series of straight lines and boxes etc. Well, today I did it!!! The base colour of the card stock is Not Quite Navy with a Night of Navy inkpad swiped across it (faux wood-grain style) and MANY layers! Here's my DL (99mm x 210mm) TARDIS Card!
The writing on the top I printed out in Word using white bold Century Gothic font expanded by 125% in a black background table with three columns, no spacing and fonts re-sized to fit and look like the TARDIS. The text on the door-panel is just pencil scritchings made to look similar to the writing that's on the police box. As last week's BBC episode involved one of the "cracks" being observed through the keyhole of the TARDIS door, I had to include the lock complete with black for the keyhole. Note this is the most recent TARDIS, including the St John's Ambulance round white emblem. When the family had a look at the card, they immediately opened it to look inside. Well, I thought, I really need to go the whole nine yards. So, here's the punch-art I made for inside:
Don't ask for instructions at this point! I spent about 4-5 hours on this today and it was a case of punching, re-punching, shaping, re-shaping to get the look I wanted. The Doctor's and Amy's hair, the Doctor's braces, Amy's shirt are made using various parts of the Extra Large Two-Step Bird currently available in the Autumn Winter Stampin' Up! mini catalogue. The Doctor was going to be holding his sonic screwdriver, but it looked a bit rude when I put it in a hand, so I tucked it in his jacket. His jacket flicks out hugely because I built him from shirt outwards and had gone to the trouble of adding his red braces, so had to make sure they could be seen! There is actually another one under his jacket on his left as well. The picture itself was inspired by a drawn picture by Kinky-Chichi. I find it much easier to work from a drawn picture for these things - someone else has done the hard stuff, simplifying colours and structures down to more basic elements. I'm quite pleased with the results! Feel free to comment!
Thursday, May 13, 2010
Inklings Team Bloghop!

Welcome to The INKlings’ Team’s first ever blog hop. You may have arrived here from Christie's Creative Corner or just be visiting my blog, whichever way once you’ve checked out my creations you can continue the hop through the link at the end of this post to the next team member.
What style of cards do we frequently get asked for inspiration for? More often than not it’s masculine cards, be it little boys or grandfathers everyone seems to struggle with cards for the males in our lives. So as a team we thought we’d help you out by providing you with 20 team members’ fantastic blogs that you can hop through and get lots of fantastic ideas from.
Want to win some Blog Candy? Simply leave a comment on each blog and then email Michelle D and let her know you’ve done so and you’ll be in the running for a fantastic prize of 20 handmade cards plus other goodies. Sorry Blog Candy prize not available to Stampin' Up! demonstrators.
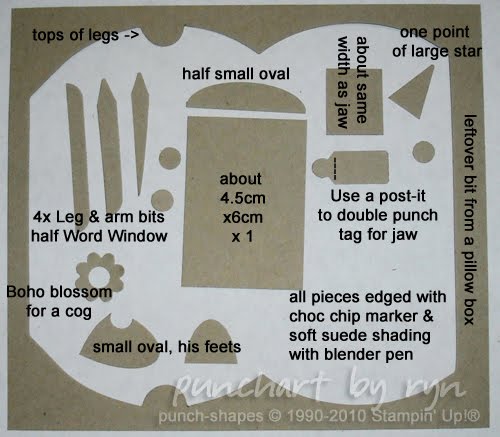
Now to the meat in the sandwich! Here's my contribution, a punch art up-sized version of the little "Get well soon" robot in Lots of Bots. I had loads of Kraft cardstock left over after doing those many many pillow boxes for Mother's Day, so I've used up some scraps to make Mr Bot here. He's so forlorn and sweet! Anyway, I've repaired his arm so he's not looking quite so broken...
Well that’s all from me. Next stop on the INKlings’ Team Blog Hop is my fellow Children's Hospital volunteer, Fiona Brown. Have fun and don't forget to leave a comment on each blog to win some great Blog Candy.
Saturday, April 24, 2010
Pillow box bird house
So the specifications were to make something "Ryn-ish" to demonstrate at my upline Michelle's Stampin' Up! Autumn/Winter Mini catalogue launch today. This is what I came up with this morning using the pillow box die:
Train of thought was "little bird houses are neat, how could I make one?" followed closely by "How could I make one demonstrating the Big Shot and using my available Sizzix dies?". So, is it decidedly Ryn-like? Michelle thought so and I'm hoping she loved the choccie eggs inside.
Full instructions are available at my demonstrator site.
Train of thought was "little bird houses are neat, how could I make one?" followed closely by "How could I make one demonstrating the Big Shot and using my available Sizzix dies?". So, is it decidedly Ryn-like? Michelle thought so and I'm hoping she loved the choccie eggs inside.Full instructions are available at my demonstrator site.
Labels:
bird house,
pillow box,
Punch Art,
punches,
sizzix
Sunday, April 11, 2010
Challenges addressed
Carol's challenge was for me to do a punch-art dragon. As she went ahead and did one herself, I was a bit stumped as to what type of dragon I could do... I have a few very gorgeous little ceramic figurines called Pocket Dragons and one of my favourite little characters is one called "I Didn't Mean To". So this card is based on that dragon. I "borrowed" Carol's cave idea and the line of red under his bottom is sticky strip ready to pop chunky glitter on. Didn't quite finish it...

t_lockhart5 suggested I make a card with Bakugan and waved a red flag at me by suggesting it possibly couldn't be done. Well, here's one! Perhaps not terribly refined yet, but I've printed a few images to work from. Also, both my darling sons enjoy playing (arguing, fighting, shouting?) with bakugan so I can borrow some to use as templates.

Finally I did a very simple Google search on Cartoons... Woodstock and snoopy are two of my favourite peanuts characters. And the sentiment fit perfectly with this image! I think I need to do Snoopy's head again - I wasn't careful enough with drawing his eye and mouth. Would love to do one of these with him lying on the roof, or one with him being the Red Baron!
Thanks for the challenges everyone! I'll continue working through the excellent suggestions!

t_lockhart5 suggested I make a card with Bakugan and waved a red flag at me by suggesting it possibly couldn't be done. Well, here's one! Perhaps not terribly refined yet, but I've printed a few images to work from. Also, both my darling sons enjoy playing (arguing, fighting, shouting?) with bakugan so I can borrow some to use as templates.

Finally I did a very simple Google search on Cartoons... Woodstock and snoopy are two of my favourite peanuts characters. And the sentiment fit perfectly with this image! I think I need to do Snoopy's head again - I wasn't careful enough with drawing his eye and mouth. Would love to do one of these with him lying on the roof, or one with him being the Red Baron!
Thanks for the challenges everyone! I'll continue working through the excellent suggestions!
Monday, March 22, 2010
I need a challenge
So I need a challenge! What would you like to challenge me to make as Punch art? Quick re-cap, I've done Wall-E and Eve...
Yoda...

Marvin...

Asian dolls...

And of course Mr Bump...

So, offer me a challenge of something you think might be far too hard for me to do! ;) Or a favourite character that you'd like to see done as punch art! I'm up for it! Suggest in my comment section and I'll do my best to come up with something.

Marvin...
Asian dolls...

And of course Mr Bump...

So, offer me a challenge of something you think might be far too hard for me to do! ;) Or a favourite character that you'd like to see done as punch art! I'm up for it! Suggest in my comment section and I'll do my best to come up with something.
Saturday, February 20, 2010
Wall-E Punch Art
So it's Toby's 5th birthday tomorrow. Here's the card I made for him very surreptitiously last night. Cardstock colours used are Creamy Caramel, More Mustard, Going Gray, Basic Black, Tempting Turquoise and Whisper White. Ink is Close to Cocoa, Chocolate chip, Certainly Celery and Green Galore. Punches I've used are Word Window, Small Oval, 1 & 3/8" Square (or bottom of the Tag as the box is a little shortened), Star (to notch the small oval for Wall-E's eyes), Spiral and Wide Oval. I've used a regular hole-punch or the retired 1/8" circle punch for the eyes. I've also crimped a piece of Going Gray before punching. Can you guess which stamp I used to create Eve's little plant? Post your answer in the comment section!
Monday, October 19, 2009
Classic Alien Punch Art
I've now got an alien bug in my bonnet about Alien punch art. More research and the ideas kept buzzing and popping and fizzing in my brain. I'm a long term Star Wars and particularly Yoda fan - "Do or do not. There is no try." - hence the following card which was SOOO much fun to make!
And of course, who could forget dear old Marvin the Martian. "Where's the Kaboom? There's supposed to be an Earth-shattering Kaboom!"

Enjoy!
And of course, who could forget dear old Marvin the Martian. "Where's the Kaboom? There's supposed to be an Earth-shattering Kaboom!"Enjoy!
Thursday, October 15, 2009
aliens among us!
Punch art Aliens created for my SU sister Clare. She lamented the lack of alien punch art online and this is something like what I came up with yesterday. The only thing they're lacking is some punny or catchy alien message... I was thinking they are perfect for boys birthdays but can't think of a good message. Drop me a note and let me know what you'd suggest!
Wednesday, October 07, 2009
China Dolls
I was so happy with my little punch-art Asian dolls, I suggested to Caitlyn that we make another similar card for her best friend Bronte who celebrates her birthday this weekend. Bronte is Chinese and her favourite colour is red so we made this little dolls to represent Bronte and Caitlyn. Aren't they cute?
Monday, October 05, 2009
Inklings Cyberstamp Punch Art Challenge
My final challenge for the evening is a Punch Art Challenge. Like my Russian doll last cyberstamp I hosted, this is inspired by images that Stampin' Up! Australia currently doesn't include in the Idea Book Catalogue. There's no reason why we can't create punch art of images we demonstrators might wish were in the catalogue, is there?? So here's my Asian Dolls card:
Friday, June 19, 2009
Mr Bump
Had a bit of fun with my spinner cards - I've been making loads of Elmo, Grover, and Cookie Monster spinner cards lately. This one turned up in my head while watching the Mr Men Show with the kids the other day. How would Mr Bump look on a spinner card? I think this would lend itself well to Mr Messy, Little Miss Sunshine and Mr Bounce as well! Don't you?
Subscribe to:
Posts (Atom)