 Wee bit proud of myself and hubby for managing to get this together on our own. Saved ourselves an additional $140 due to DIY.
Happy Christmas, Cool Yule and Merry Solstice to everyone!
 Wee bit proud of myself and hubby for managing to get this together on our own. Saved ourselves an additional $140 due to DIY.
 A few simple cards for the stall too. The two on the left are made with Cajan Craze and Cherry Cobbler card stock (run through the Vintage Wallpaper embossing folder) with a touch of Pear Pizzazz. The sentiments are stamped from Christmas Classics and Word Play. I used Contempo Christmas for the bright coloured baubles on the card on the right. Thanks muchly for the creative assistance from Clare, Michelle, Malyn and Caz at our team Christmas get-together.
 So, you see, I've not been idle! I'm also working on hand quilting my patchwork. I'll post a picture when I'm nearer completion of the panels.


 Don't pay attention to how off-square this is - this is my very first attempt at patchwork. I pieced together nine-squares and then cut them in half vertically and horizontally to make the squares. I then laid them out on the table and moved them around til I was happy with the pattern. Then I wanted to expand the whole thing a bit - after finding no joy in my fabric scraps, I delved into my Stampin' stash and pulled out the 1 1/4" pink pirouette grosgrain ribbon from Stampin' Up's Autumn mini. I cut the ribbon and singed the edges using a candle to stop them fraying. I've now had to order more fabric so I'll be able to make this a decent size. The fabrics are just delicious and some of the "recipes" on the ModaBakeshop website are sweet! I'll be making at least one more quilt once I get better at making things square!!
 As you can see, I was rather obsessed with the Blushing Bride, Pear Pizzazz and Peach Parfait colour combination. Here's Perk Up using the same colour combo and the Retro Remix wheel.

 I also helped with this make-and-take card using the new Morning Cup stamp set and Take a Sip wheel. I have the clearmount version so it was a great opportunity to show off how easily the images assemble without having to use a stamp-a-majig. I love my clearmount stamps and especially love the Stampin' Up! clear blocks - they are a beautiful weight with a lovely rounded finger-hold edge all the way around. This card was made using reverse-masking to sponge colour into the different areas of the teapot and cup. I used a craft knife to cut away the area to be coloured from an image stamped in the middle of a post-it. Its a great technique for adding even colour to an image and it was so much fun to do with these little tea-cups! The guests all thought I was a bit bonkers for cutting around the little flowers on the teacup. We also used the new Stampin' Write markers now available in the In Colors! WOW! Its so lovely to get detail through with a fine-tip instead of using a blender pen or aquabrush loaded with In Color ink!
 I'm thrilled with the new In Colors. This card uses Pear Pizzazz, Peach Parfait and Blushing Bride. Lovely colours!
 The next card was meant to be a CASE of one of Jayne Mercer's cards. In the end, apart from the layout and using Kraft and Pale Plum, it looks very little like her original! But similar enough to see where the CASE came from.
 Because I see the same group of ladies every month, I find it difficult to come up with new box designs with which to WOW them. This one is an adapted "Sevens" box - score at 7 cm all around an A4 card and fold in this complicated way! Once closed, you can fit a chocolate or two inside. When open, the card folds right out so you can put quite a large message inside. Its very cute and quite easy to do. Considering I threw this together, I'm very pleased with the results. I'm going to miss using Kiwi Kiss at the beginning of September!

 I liked the bold red and black theme for this lady. The original image showed her walking a dog, but I kinda like the bag too. And the shoes! And the legs and the skirt!
 Among the pictures I found the 1920's fashion... Hats say chic fashion to me.
 Next on my list to try is an Audrey Hepburn look. I adored her in her movies... Sabrina, My Fair Lady, Breakfast at Tiffany's, Funny Face and Roman Holiday. And she was the quintessential stylish, graceful and poised lady. One of my favourite quotes of hers is:
For beautiful eyes, look for the good in others; for beautiful lips, speak only words of kindness; and for poise, walk with the knowledge that you are never alone.
-- Audrey Hepburn

 And lastly (or should that be "firstly" cos I did these ones first!) the inspired by nature daisy silhouette in various colours with a spot of crystal effects and some chunky sprinkles for a bit of interest. These work with almost any sentiment (possibly not Father's Day!!) and I used my much loved Occasional Greetings for "Happy Mother's Day".
 Hope that's inspiring!
 The writing on the top I printed out in Word using white bold Century Gothic font expanded by 125% in a black background table with three columns, no spacing and fonts re-sized to fit and look like the TARDIS. The text on the door-panel is just pencil scritchings made to look similar to the writing that's on the police box. As last week's BBC episode involved one of the "cracks" being observed through the keyhole of the TARDIS door, I had to include the lock complete with black for the keyhole. Note this is the most recent TARDIS, including the St John's Ambulance round white emblem. When the family had a look at the card, they immediately opened it to look inside. Well, I thought, I really need to go the whole nine yards. So, here's the punch-art I made for inside:
 Don't ask for instructions at this point! I spent about 4-5 hours on this today and it was a case of punching, re-punching, shaping, re-shaping to get the look I wanted. The Doctor's and Amy's hair, the Doctor's braces, Amy's shirt are made using various parts of the Extra Large Two-Step Bird currently available in the Autumn Winter Stampin' Up! mini catalogue. The Doctor was going to be holding his sonic screwdriver, but it looked a bit rude when I put it in a hand, so I tucked it in his jacket. His jacket flicks out hugely because I built him from shirt outwards and had gone to the trouble of adding his red braces, so had to make sure they could be seen! There is actually another one under his jacket on his left as well. The picture itself was inspired by a drawn picture by Kinky-Chichi. I find it much easier to work from a drawn picture for these things - someone else has done the hard stuff, simplifying colours and structures down to more basic elements. I'm quite pleased with the results! Feel free to comment!

 The pieces I used:
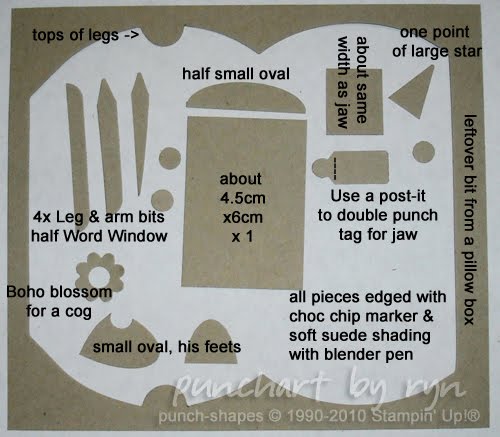
 So here's the reason I wanted to do something different - these are the chocolate pillow-boxes I made for my children's school Mother's Day stall last week. All the tags have the "One of a Kind" (c) Stampin' Up! stamp on the back, which I find endlessly amusing when I'm stamping out 300 Mother's Day items!
 These are bath salts I put together at the last minute. Neroli, Lavendar, Rose and Patchouli. I should have done Lime for the last lot - Patchouli didn't sell well! The labels were printed up on the computer.
 While I was sitting selling raffle tickets with my leg up and an ice pack on my ankle (short version: I sprained it on the way into the school while carrying the box of chocolate things), I made some more tags. I'd already stamped them out and run some tape along the back of the card-strip, so it was just a matter of punching them out. We sold them 2 for 50 cents and they were quite popular. I have stacks left over though.
 I didn't manage to take a picture of the 100 Mother's Day cards I pumped out. The camera battery went flat! They were all single layer cards without embellishment and with matching envelopes. They sold reasonably well too - I've some leftovers, so I'll post the results when I've taken photos!
 Train of thought was "little bird houses are neat, how could I make one?" followed closely by "How could I make one demonstrating the Big Shot and using my available Sizzix dies?". So, is it decidedly Ryn-like? Michelle thought so and I'm hoping she loved the choccie eggs inside.

 Thanks for the challenges everyone! I'll continue working through the excellent suggestions!


 Yoda...


 Here he is just a few minutes ago being a silly-billy.
 And here he is blowing out his 3+6(=9) candles.
 His birth started a long and winding road which included the inception of my blogging as an "Optimist with PND". Much work has been done to reach this point including large amounts of cognitive behaviour therapy (CBT), psychiatric help, DoCS early intervention, an invaluable family stay at Coral Tree Family Service, medication, creating a post-natal depression support group, a hospital admission for PND right through to beginning to wean myself off medication. Ryan, I'm so glad you are a part of my life. Its been a hard road for me to grow into motherhood and you have helped me learn patience, understanding, resilience and most of all the deep connection between a mother and son. I love you, darling boy!

 So, what do you think? More distinguished?? ;)

